
InStep - Help
Surface Repair - Selections & Visuals
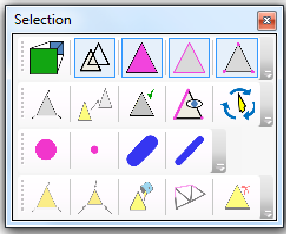
The Selection & Visuals Tool Bar contains functions for interacting with the graphical display and selection of items. Each tool is explained in further detail below:

Toggles between a Perspective (Default) and Orthographic view of the data. Orthographic view is more useful for comparing relative sizes since it does not distort the view as a function of depth. Perspective view is considered more 'natural' since bodies far away are displayed smaller.

Toggles the display of facets between transparent (default) and opaque. Opaque display allows better identification of what is on the outside
where a transparent view gives a better visual representation of the entire data available.

Toggles selection of facets on or off. Can be toggled through the shortcut Ctrl + F.

Toggles selection of edges on or off. Shortcut: Ctrl+E.

Toggles selection of vertices on or off. Shortcut: Ctrl+V.

If only a partial display of the data is given, the amount shown can be increased step wise using this tool. Facets lying on the edge of visible items will be shown in addition to what is already visible. Shortcut: Space Bar.

Converts the selected items to the only visible items. Allows reduction of the amount of visible items and therefore a performance increase.

Shows all available data in the viewer. If a large amount of data has been loaded, using this may make the application temporarily unresponsive or even crash if insufficient memory is available.

Shows items that are selectable only. Depending on which items are visible, it may be required to re-apply all selection toggles before de-selecting this option.

Toggles between selection modes. Mouse-over the image displays information about the current selection mode: Either entities are added to the selection by clicking on the object and removing from the selection by shift-clicking or a new item is selected if simply selected (and all previous deselected) and an item is added to the selection if the shift key is held while selected (or removed from the selection if it is already selected).

The display of the data uses separate objects for each vertex. The size is calculated during the data conversion to a standard size. Depending on the objects, the size of the vertices can be too small to be useful. This option increases the displayed size of the vertices incrementally.

Decreases the displayed vertex size stepwise.

Does the same as for the vertices but for the Edges. Stepwise increases the edge size as displayed.

Decreases the displayed size of the edges.

Expands the selection by also selecting neighboring facets next to already selected facets.

Reduces the selection size by removing from the selection items that are on the periphery.

Grows the selection by finding neighboring facets to the first one selected that are within an angle limit. By default the angle limit is set to 30 degrees. Upon selecting a facet, this tool becomes available. Clicking the tool brings up an input dialog box where the angle limit can be defined. Once the angle limit is set (or by using the default 30 degrees), the input can be skipped by first selecting a facet and the using the shortcut LMB+Alt and clicking on the facet again, thereby selecting all facets that are attached to the first and within the specified angle limit.

Edge equivalent to the previous tool. Selecting an edge and then pressing this button selects all edges that are attached to the last selected edge and are also only used by one facet (form the edges of a hole). Shortcut is to select an edge and then LMB+Alt the same edge again.

Clears all selections. Shortcut: Esc.