Generating a new / better surface mesh : Remeshing Bodies
Time to read: ~5 min
The Remesh tool provides a way to improve the quality of the facets in a body by performing a set of merge, split, move operations.
In order to provide some level of control over how much the original data is affected by the remeshing operation, different options are available.
Options
The following options are available for the Remesh Tool:
-
Factor
-
The remesh Factor is a unit-less value that defines how much each node/location is allowed to move during each iteration of the algorithm. It is recommended to keep this value
small and instead favor a larger number of iterations as it is otherwise possible for the data to start experiencing overlaps, flips or other issues.
-
Iterations
-
This value defines the number of steps or iterations are to be performed. It is generally beneficial to keep both the Factor and Iterations at
reasonably small values and to keep an eye on how much the data is changing during the process.
-
Fix Loops
-
With this option enabled, the algorithm will attempt to prevent edges that are not connected (boundaries of non-solid bodies) from being gradually moved into
the existing body. By enabling this option, the vertices on these boundaries can still be moved along them, but not into the body.
-
Fix Boundaries
-
This is the more aggressive option to the Fix Loops and instead of allowing vertices on the boundary to move along the perimeter, they are completely fixed and cannot
be moved. This is generally not beneficial as it means that any attached facets will similarly experience some amount of restraint. However, there are
cases where this may be explicitly desired such as where different meshes are to line up after the remeshing has been completed.
-
Re-Project Mesh
-
This option can be useful if the original data contains coarse sections that would otherwise take many iterations to properly address. By enabling this,
the body is first completely re-sampled and the resampled data is then processed. For very dense geometries (such as 3D scans), this may lead to an inadvertent
removal of small details and therefore keeping this option enabled should be evaluated on a case-by-case basis.
-
Keep Topology
-
This option overrules the others and strictly only allows edges to be split in two. This option is intended for cases where a 'mechanical' body is being modified
in such a way that very long and thin (sliver) faces are to be split into several smaller ones. With this option, the number of Iterations defines the maximum number
of iterations by which edges are re-evaluated for their length and then split if their length is larger than the threshold length set.
Workflow
The general workflow is essentially the same as for all other operations. Prior to using this tool, a decision must be made as to whether or not multiple
bodies are expected and the data split if that is a possibility (splitting does not make any changes if it determines that only a single, continuous body exists).
After that, clicking the button in the tool bar brings up the Remesh tab in the Options. Making any changes and clicking the Preview button in the Apply group box
then proceeds to remeshing the body (or bodies if multiple are available and the 'All Bodies' or 'Selected' option is checked).
Once the Preview completes, indicated by the color of the displayed data changing to a light blue color, the result can be further reviewed (perhaps turning edge display on
through the shortcut Alt+E) and any parameters changed and the Preview updated. Note that the preview always works from the original data, not the last state of the Preview.
Once the result is as desired, the changed can be made permanent by clicking Apply. If no preview has been generated, clicking the Apply button first generates the data and then
assigns it to the current data.
Examples
A few simple examples illustrate the effect of this. Here the original body is shown that is being operated on (with Edge display enabled using Alt+E)
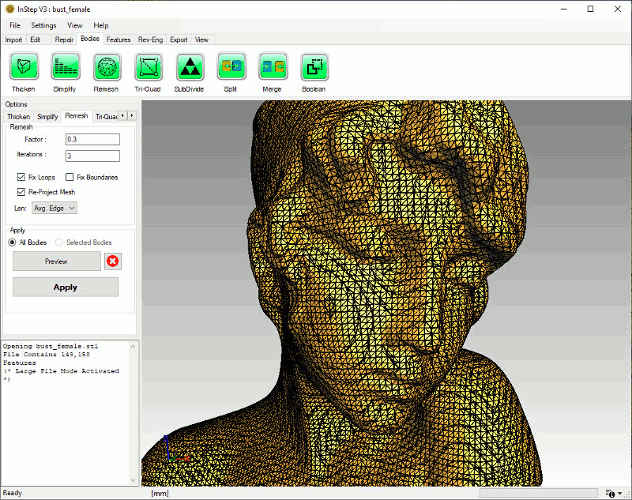 Original Data
Disabling the re-project option, after performing one iteration (with a factor of 0.2), the mesh is shown below, containing some
regions where the quality is not ideal, though better than in the original data:
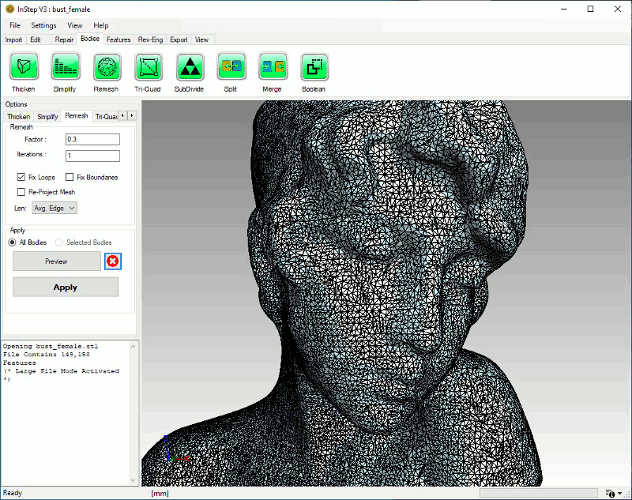 Single Iteration, no Re-Projection, Factor 0.3
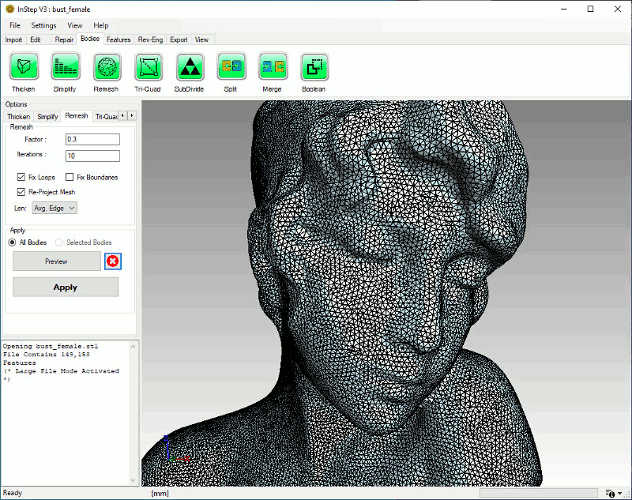
Running the same values but for 10 iterations generates this:
 10 Iterations, no Re-Projection, Factor 0.3
By using the Re-Projection option, after ten iterations, the body retains more of the original shape as the
slender facets over the eyes did not contribute as much in terms of dominating the local changes:
 Ten Iterations, with Re-Projection, Factor 0.3
Target Edge Length
One guiding parameter to keep in mind with this is that the algorithm attempts to converge on a target edge length. By default, this value is the average
edge length of the (first) body. The dropdown box (labeled "Len") allows a few different options:
- Avg. Edge
- This uses the average of all the edge's length as the target for the remeshing process. In general, this results in surfaces that are quite similar to the original in terms
of definition.
- Min. Edge
- This option should generally be avoided as it can result in a very large number of facets being added. The Minimum edge length is the smallest of any edge that is not zero.
- Max. Edge
- This usually does not result in a useful result either as the largest edge will overly simplify the result. However, if the input is already fairly uniform, then this is a useful option
- Value
- In many ways, this is the most useful option. There is a somewhat 'hidden' function with this value: if the Avg, Min or Max edge value is first selected and then the Value option
chosen, it will show what the previous value was, therefore providing a quick starting point relative to the other values. For example, by first selecting the Max Edge, then switching
to the Value option an upper bound can be established. Switching between the Min Edge and Value provides a lower value. Setting the target somewhere in between these will generally
result in something that is more or less detailed than the original.