 Polygons: Wrap
Time to read: ~3 min
The Wrap tool allows existing data to be completely re-meshed and potentially repair major issues that would otherwise prevent processes from completing. The approach
uses all available/selected data and first samples that surface data using a grid and then generates a new set of surfaces using the sample data and the user provided mesh
resolution
Example
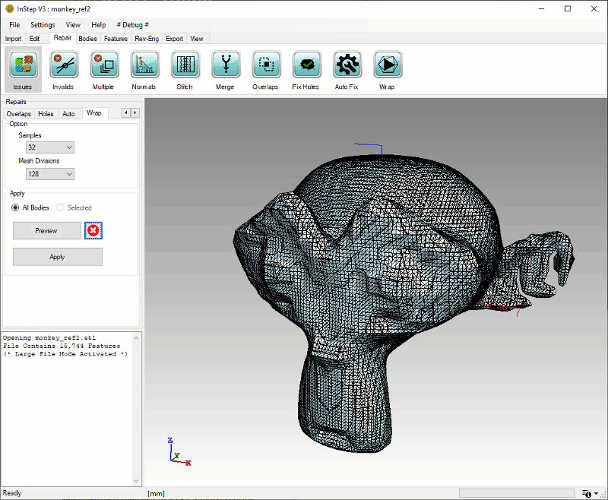
Clicking on the main Wrap tool bar will switch to the Wrapping tool details in the left hand, Repairs Tab panel. A before view of the standard Blender
Monkey (Suzanne) file is shown here:
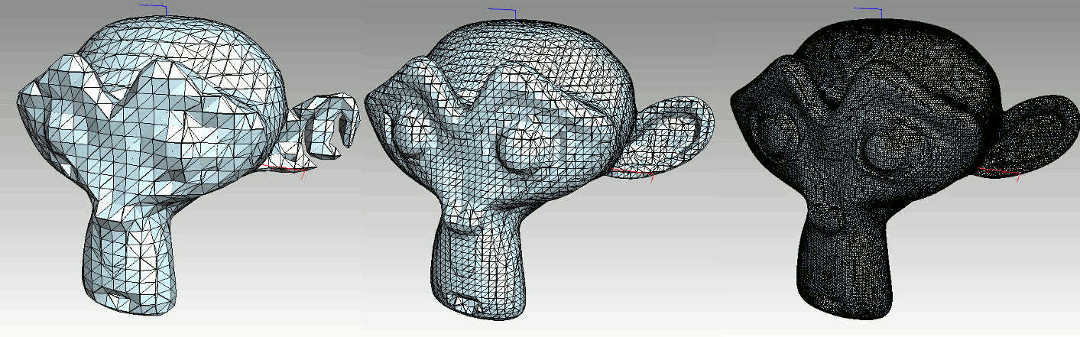
 Original Monkey Data
Note that this file would generally (without performing one of a number of repair options) not be a successful conversion. The application will, by default, report that
the data contains multiple bodies and should be split, which was, in this example, skipped.
Option: Samples
One of the two major choices is the number of samples to use. The values are a power of 2: 32, 64, 128... with a maximum of 512 as this will often represent a case
that can be quite demanding of most computers. This number represents the number of cubes that the bounding box is divided into along each side. So if, for example, the
data loaded measures 10 x 5 x 3 cm, then a value of Samples of 128 would mean that the largest edge of the box (10cm) is divided into 128 cubes (so 0.78mm) and the data sampled
along the X, Y and Z coordinates using this resolution. Doubling this value to 256 has the effect that the overall number of cubes is increased by a factor of 8 (2 for each coordinate).
In the worst case where all sides are the same, a resolution of 512 means breaking up the data into 512^3 (134.2 Million) cubes and testing each cube for intersection with the data.
This should explain why the upper limit has been set...
Option: Mesh Divisions
The Mesh Divisions are closely related (and use the same logic) but apply to the output rather than the sampling: Once the original data has been sampled, a new set of surfaces are
generated using the sampled data to define where data was originally defined.
It is therefore possible to sample and re-mesh at different resolutions, though it is generally recommended that the two be kept somewhat similar with the Mesh Divisions
being the same value as the samples or smaller (using a larger value just packs more cells into the result but does not otherwise provide any benefit).
One additional item to mention is that the tool uses a parameter from the Application Settings, under the Repair group: UseParallelForRepairs. This option defines whether
the sampling and meshing is to be run on a single thread or in a multi-threaded manner. For smaller files and lower resolutions, the result is not greatly noticeable but for
larger files it may consume all available threads and slow other processes down, therefore the default is set to not use the parallel capabilities.
Option: All, Selected, Preview, Clear & Apply
As with the majority of the Repair tools, the possibility exists to apply the tool's capabilities to All currently loaded data or only those selected (if there are
multiple bodies). Using the Preview button will show what the result (for the selected bodies only) looks like before making changes. Clearing the preview resets the
display data to its current state and the Apply option makes the changes permanent.
Example: Samples at 32, 64 and 256, (Mesh Divisions using the same value)
 Monkey Wrapped at 32, 64 and 256 Samples, using the same values for Mesh Divisions
One item to point out here is that, depending on the sample resolution, some regions may become collapses (as with the ear).
Example: Sample at 32, Mesh Divisions at 128
 Monkey Sampled at 32 and Meshed at 128 cells
From this it can be seen that using a lower sampling rate but higher mesh divisions does not always result in useful data even though the output contains more cells.
Shrink - Wrap
The Wrap and the Shrink Wrap tools are internally quite different. Whereas the regular Wrap tool uses either point data or facet data to redefine the
surface mesh, the Shrink-Wrap works more from the outside inwards.
From a technical perspective, the tool uses a Convex Hull (a modified QuickHull algorithm) as a starting point and then re-meshes this surface based on an iterative
approach. Various options are possible as explained in more detail below.
The figure below shows the process conceptually:
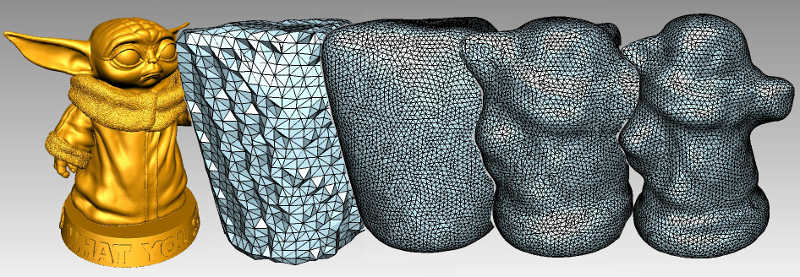 Grogu Figurine at different steps of the process
The first step generates a convex hull (basically a body that contains all the original points within it and does not 'fold' inwards).
Though the actual convex hull is not directly provided, there are some ways to see its general shape (see Settings below).
As it is possible that the hull generated is not completely solid and has very high aspect ratio data, it is first processed through a re-sampling and
re-meshing step where the data is better represented by similarly sized triangles.
At this point, the basic, wrapped, surface is done. From here on, the process of Shrinking it comes into play. It should also be noted that the data
generated up to this point is stored in memory and as long as its parameters are not changed, the wrapped surface can be reused for different iteration/factor combinations.
During the remaining iterations, the mesh, at each location, is compared between the new surface and the original surface and the vertices moved along the vector
from the new location to the old location, based on which old location is the closest. The amount each vertex is moved is defined by the Iteration Factor, basically the
factor along this vector to move it.
 Grogu Figurine showing result at different iterations (-200 edge length, 200 iterations at 0.1 factor)
Shrink Wrap Settings
Different application settings are available to modify the behavior and ultimate outcome of the shrink wrap process. As always, it is highly recommended
to first experiment with a simpler file and then gradually progress towards more complex models. Similarly, starting with a coarse convex hull body (i.e.,
using a value of perhaps -20) allows the effect of the changes to be seen more quickly.
The available settings are discussed below:
- Edge Length
- This value defines the target edge size to apply to the shrink-wrapped mesh. If the value is larger than 0, then the value is the actual edge length.
If the value is negative (and below a value of -2) then the largest dimension of the bounding box (aligned with the X,Y,Z axis) of the body is used and divided by
this value (as an absolute value). So, for example, if the bounding box of the imported data measures 2 x 3 x 5 units and a
value of -20 is set, then the edge length is calculated as max(2,3,5) / 20 = 5/20=0.25.
Generally, it is preferred to evaluate the result using a coarse mesh first before moving to a more detailed mesh.
- Iterations
- This defines the number of approximations to use. For each iteration, the new mesh is moved by the factor towards the original one. If too few steps are used and the
factor is too high, then it is likely that the mesh will become distorted or otherwise corrupted. Values in the range of 5-100 are generally found to meet most uses.
- Iter. Factor
- The Iteration Factor is the multiplier applied to the vector from the location on the new mesh to the nearest location on the original mesh. A value of 1.0 means that the
new location is to be placed where the old location was found. Though this is a possible value, it is recommended to take smaller steps to more gradually approach the locations.
- MaximumShrinkEdgeIterations
- This value is set from the Menu: Settings>Application Settings>Repair. It defines the upper limit on the number of iterations to apply to the original
convex hull for remeshing. Internally, the algorithm stops once less than 0.1% of the edges are affected by an iteration or until these many iterations have been completed.
- MotionRemeshIterations
- This value is also set from the Application Settings. It defines how many re-meshing iterations are to be performed during each approximation Iteration. If this
value is set to 0, no re-meshing is applied during the iterations, likely resulting in the mesh becoming locally distorted or stretched.
Caching
A few words on data efficiency:
The process of generating the original Convex Hull, repairing its surface, resampling the data and performing initial re-meshing to it can be somewhat time consuming.
As this mesh is not affected by the number of iterations or the iter. factor, it is cached (stored in memory) once first completed. If the Edge Length is changed, then the
cached copy is deleted and re-created when needed.
The process of re-creating and caching is not visible to the user but the progress bar shows slightly different behavior based on its use with it re-setting during the
wrapping process. Keep in mind that changing the Edge Shrink Iterations from the Application Settings does not affect this, so changing that value should be followed by clicking
on the 'Clear Preview' button which also clears the cached data.